You can access the service management capabilities and perform
day-to-day tasks (creating, deleting, and updating stuff) through the
Service Management API. This RESTful HTTP API can be accessed from both
inside and outside Microsoft data centers. Unlike the Windows Azure
storage APIs that you’ll see later in the book, this API is free to
use.
Note: The “free” part comes with a caveat. Any misbehaving/malicious
usage could get throttled.
The Service Management API and the storage APIs form the two major
REST API families in Windows Azure. However, there’s one major
difference between the two. While the storage APIs are targeted at every
Windows Azure developer and will show up in almost all Windows Azure
applications, the Service Management API is meant primarily for
toolmakers. Your day-to-day interaction with this API will be to use tools
built on top of it.
In light of that, this chapter will only lightly touch on the REST
API URIs and protocol that make up the Service Management API, and will
focus more on the tools you can use with it.
Note: To see detailed descriptions of the Service Management API
protocol, check out the official documentation at http://msdn.microsoft.com/en-us/library/ee460799.aspx.
1. Operations
The API offers a subset of the functions you can perform on
the Developer Portal. You’ll find that almost all day-to-day functions
can be performed using the API (or, to be specific, tools built on top
of the API), and you’ll rarely (if ever) need to visit the Developer
Portal.
Following are some of the operations supported by the API:
Listing all hosted services, storage services, and affinity
groups.
Creating new deployments and deleting existing
deployments.
Viewing properties for an individual deployment (including the
ability to drill into each role instance in the deployment and see
what state it is in).
Running or stopping existing deployments.
Swapping deployments.
In-place upgrading of existing deployments to new versions.
This further splits into performing a manual rolling upgrade and an
automated upgrade. You’ll see how this works a bit later in this
chapter.
Viewing and regenerating storage credentials.
The API doesn’t support all the functionality the portal does.
Operations such as creating a new hosted or storage service, getting at
billing data, and enabling Content Delivery Network (CDN) access, all
require using the portal.
2. API Authentication
The first step in using the API is to figure out how to
authenticate against it and call it. All calls to the Service Management
API must be authenticated. Since all of the operations/data exposed by
the Service Management API deal directly with your services and their
states, you want to ensure that only you (and people you authorize) have
access to them. Hence, unlike the storage APIs, no anonymous requests
are allowed.
Authentication in the Service Management API is built on
Secure Sockets Layer (SSL) client authentication. You are
no doubt familiar with SSL. When you visit any URL with an https://
prefix (with a lock icon in a modern web browser), that’s SSL in action.
This is typically used to identify the server to you (the client).
However, SSL can also be used to authenticate in the other direction—the
client to the server. This is called client
authentication, and it is supported by all web browsers, web
servers, and operating system stacks.
Client authentication requires a client certificate in X.509 format. X.509 is an
industry-defined format for SSL certificates. X.509 and client
authentication can be used in myriad ways, with all sorts of extensions.
X.509 certificates themselves are considered by many developers to be complex
and difficult to use. Thankfully, the API limits itself to using X.509
certificates in the simplest way possible, and shields you from most of
this complexity.
Note: If you’re curious about X.509 and SSL client authentication,
Wikipedia has good articles that go into great detail on both
topics:
3. Creating an X.509 Certificate
At this point, you may wonder what an X.509 certificate really is. For
the purposes of this chapter, you can think of an X.509 certificate as
something that contains a public-private key pair. You generate the
public-private key pair when you create the certificate (typically using
RSA). The private key portion is sensitive data, and should be protected
(in Windows, through the certificate store). The public key portion can
be widely distributed.
Let’s create our very own certificate. Dozens of tools are
available for creating X.509 certificates. On Windows, if you have IIS
installed, go into the Server Certificates section and select “Create Self-Signed
certificate.” Another handy way is to use the following command line,
which uses the makecert.exe tool to
create your very own self-signed certificate creatively titled
“Preconfigured Cert”:
makecert -r -pe -a sha1 -n "CN=Preconfigured Cert"
-ss My -len 2048
-sp "Microsoft Enhanced RSA and AES Cryptographic Provider" -sy 24
preconfig.cer
This cryptic command line generates a self-signed certificate,
containing a 2,048-bit key pair, signed using the RSA algorithm, and
outputs the public portion of the certificate to a file named preconfig.cer. This file contains nonsensitive
data, and can be freely shared. In fact, this is the file you’ll be
uploading to Windows Azure.
At the same time, the -ss My
parameter installs the private key portion of the certificate into your
certificate store. Figure 1 shows the
certificate in the certificate store.

Note: If you’re not on Windows, the OpenSSL set of tools has great
support for certificates. You can create your self-signed certificate
with the following command:Note that the output file is PEM-encoded by default. You’ll need
to use OpenSSL’s conversion capabilities to convert it into the
.cer format that Windows Azure
accepts.openssl req -nw -newkey rsa:2048 -days 365 -nodes
-x509 -keyout preconfig.pem -out preconfig.pem
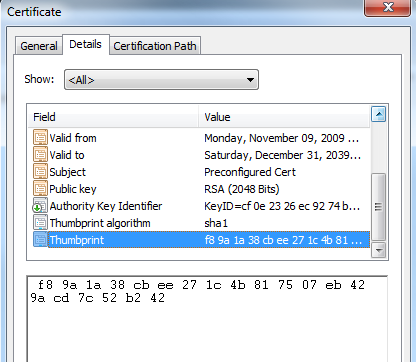
If you double-click on the certificate in the certificate store,
you can inspect the properties of the certificate. One property is of
interest: the Thumbprint. Figure 2
shows the Thumbprint highlighted for this particular certificate. You’ll
be using this Thumbprint later to identify which certificate you want to
use with the tools that work with the API.
Warning: This private key portion of your certificate contains very
sensitive data. If someone else gets it, she can impersonate you, and
do anything you can with the API. When transporting the certificate
between machines (typically by exporting it to a .pfx file), be sure to set a strong
password.
4. Uploading the X.509 Certificate
The next step is to upload the .cer file through the Windows Azure Developer
Portal. This lets Windows Azure know that it can trust that particular
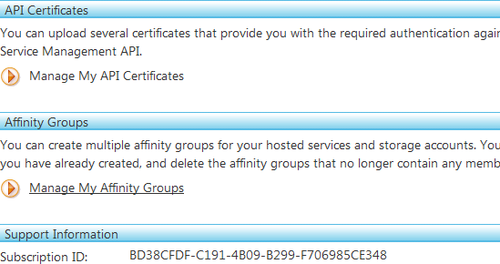
private-public key combination for your account. To do this, go to the
Account tab in the Developer Portal, as shown in Figure 3. This contains your
subscription ID (which is your unique user ID on
Windows Azure) and has a Manage My API Certificates link. Clicking on
that link takes you to the API Certificates tab.
Note: The word subscription can be a bit
confusing, since in this context it originates from a financial use of
the term, not a technical one. Specifically, it refers to the billing
relationship you have with Microsoft (with your credit card, your MSDN
subscription, your free preview, etc.). If you have multiple such
accounts set up, you have multiple subscriptions. A “subscription ID”
uniquely identifies your account in such a case.
The API Certificates tab (shown in Figure 4) enables you to manage the
certificates with which you wish to authenticate. You can have up to
five certificates at any time. Typically, this is used to create
certificates for different purposes and tools. At any time, you can
delete a certificate to revoke access for that particular
certificate.
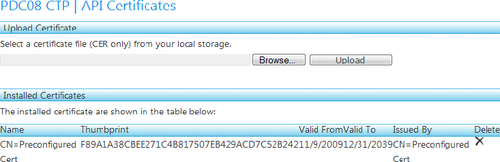
Now, upload the preconfig.cer
file you created. You should see it appear in the API listing. Note that
the Thumbprint displayed here is the same Thumbprint you saw in Figure 3.
At this point, you’re good to go with making requests against the
API.